How to make a headboard slip cover
Follow Country Homes & Interiors' step-by-step guide
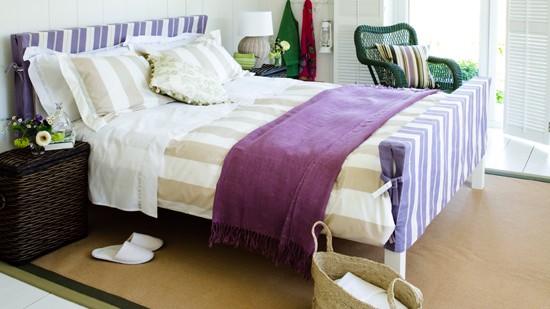
Looking for bedroom decorating ideas? Follow Country Homes & Interiors' step-by-step guide to making a beautiful headboard slip cover.
What you'll need
* Main fabric (we used Sofia, ref 1003, £22 a metre, Harlequin)
* Contrast fabric for the side strips
* Matching thread
Before you start
*Please note that this slip cover is designed to fit a substantial head (or foot) board with a flat, broad top.
You will need to tailor the instructions if your headboard is radically different in design. For example, if you have a a standard iron bedstead you may be able to omit the side panels altogether and just insert the ties between the main fabric and a facing.
*If making a foot board also note that the cover shown here is as long at
the front of the foot board as it is at the back on the mattress side. This is because there is a gap between the base of the bed where the mattress sits and the foot board, enabling the cover to be pushed down through the gap and tied at the sides.
Not all beds are designed this way so check yours: if there is no gap you will need
to make the back of the cover shorter than the front and position the
ties accordingly.
Step by step instructions
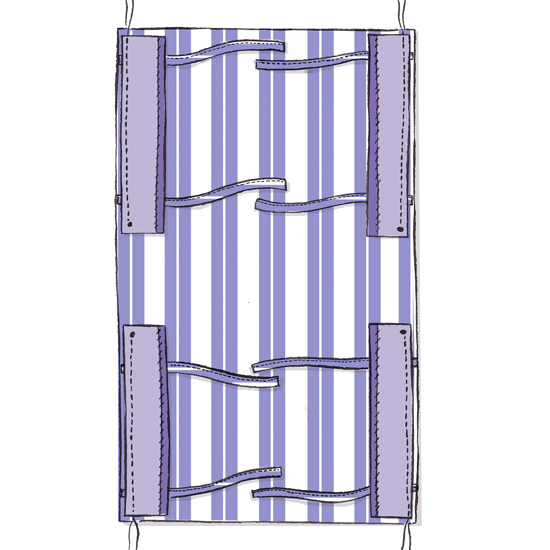
1) Measure your bed to work out the finished size of your slip cover. To work out the
length, measure from your preferred drop on the front of the head or foot board, up and over the top, then down to the rear, stopping at your preferred drop. Add 10cm in total to this measurement for hems. To work out the width, measure the width of your head or foot board and add 5cm in total for seams. Cut out a piece of main fabric to these measurements.
2)
To work out the width of the four side strips, measure the depth of your head or foot board. Halve this measurement and add 6cm in total for seams and hems. To work out the length of each side strip, measure from the top of the head or foot board down to your preferred drop at the front and also down to the preferred drop at the back if this needs to be a different length. Add 7.5cm to each strip in total for hems and seams. Cut out four strips of contrast fabric to these measurements.
3)
For the fabric ties, cut eight 12cm by 30cm strips of main fabric. Take one tie and place wrong side up. Fold one short edge in by 2.5cm and press. Fold the two long edges in so they meet in the centre and then fold in half along the length. Press and top stitch along one short and one long edge. Repeat to make the remaining seven ties.
4) Along one long edge of each side strip turn under 1.5cm then 2cm, hem and press.
5)
Lay the main fabric out flat, face up. Right sides facing and matching raw edges at the corners, pin the side strips in place along the long edges of the main fabric. If the strips are two different sizes, remember to pair them up across the width of the main fabric so that they match on the front and back of the cover.
Once pinned in place you should have a gap between the two pairs of side strips. Work out where your eight ties will need to be positioned and, matching raw edges, slip in place between the main fabric and the side strips, unpinning and re-pinning if necessary (see main illustration).
6)
Tack all side strips and ties in position and remove pins. Starting from each corner of the main fabric and working towards the centre, machine stitch the side strips and ties in place taking 2.5cm seams and stopping 2.5cm from the end of each strip. Remove tacking.
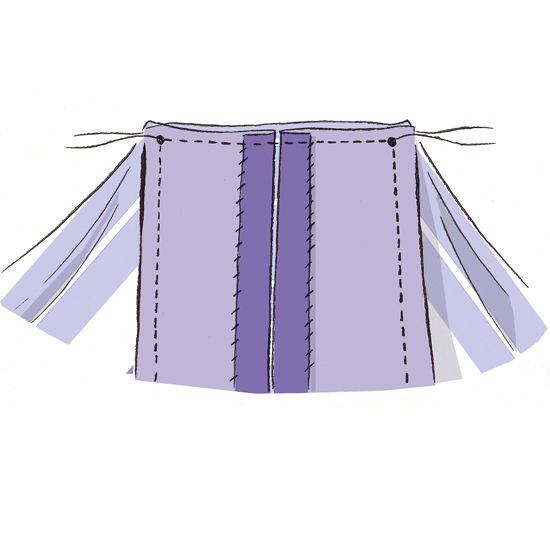
7) Bring the long hemmed edges of two adjacent side strips together so they sit
flush along their length and the top raw edges of the strips match the raw edge of the main fabric underneath. Stitch across the top of each side strip taking a 2.5cm seam (see illustration below). Repeat to stitch the second pair of adjacent side strips.
8) Trim and press open all seams, clipping the corners and snipping into the seam
allowance around top of the side strips for a neat finish.
9) Hem the front and back of the cover by turning under 2cm then 3cm and top stitching. Press.
10) Turn through, slip over the head or foot board and secure the four ties with knots or bows.
Get the Ideal Home Newsletter
Sign up to our newsletter for style and decor inspiration, house makeovers, project advice and more.
Tamara was Ideal Home's Digital Editor before joining the Woman & Home team in 2022. She has spent the last 15 years working with the style teams at Country Homes & Interiors and Ideal Home, both now at Future PLC. It’s with these award wining interiors teams that she's honed her skills and passion for shopping, styling and writing. Tamara is always ahead of the curve when it comes to interiors trends – and is great at seeking out designer dupes on the high street.
-
 Can the Dyson Purifier Cool PC1 replace your fan and air purifier? I put it to the test in my home during the height of allergy season
Dyson's Air Purifier fan ticks all the boxes for customisation, design and performance, and I think it's well worth the investment
-
 Lavender will bloom bigger and brighter if you add this £5 essential to your soil, say garden experts
This handy trick will reward you with beautiful, fragrant flowers this summer
-
 I predict this classic wallpaper trend will make a comeback in 2026 - it's a simple way to add personality to a small space
Get playful with pattern and transform your washroom
-
 Craft corner: How to create simple picture displays
Create an eye-catching display, be a whole wall of prints or a select few
-
 Craft Corner: How to make a mason jar of bath salts
We show you how to make your own mason jar bath salts. These can be for yourself or a great gift for someone else.
-
 How to make a valance curtain
Discover how to make these pretty valance curtains using Country Homes & Interiors simple instructions
-
 Get crafty this Christmas with these twig ideas
Give your home a festive woodland feel with these twiggy craft ideas
-
 Transform your windows with stunning new curtains in three easy steps
Follow our 3 simple instructions to make new eyelet curtains to transform your window.
-
 How to make candles in teacups
Check out our latest craft idea on how to make candles. Fill teacups with melted wax to make gorgeous one-of-a-kind candles.
-
 Craft corner: How to make a gingerbread felt decoration
Jennifer shows us how to make cute gingerbread decorations out of felt.
-
 Craft Corner: How to make a framed key holder
Channel Editor Vicky shows you how to make a framed key holder.