Inexpensive revamps for things you already own
Get on a mission to recondition: Take your junk-shop finds or jaded favourites and take them from old to new in no time at all
If you are in the mood for a cheap and quick upcycling project, take a look around your home at what's already there. We're sure there are plenty of possessions that could do with an inexpensive revamp. Maybe you have a cupboard full of old jeans that you've admitted you'll never fit back into or that Ikea bin in the bathroom has seen better days? Check out these ideas that will give things you already own a new lease of life at very little cost to you.
Jean Pocket Organizer
Keep your craft supplies in order with this upcycled wall display. Set against a refreshing blue and white backdrop it's sure to make your home office more productive.
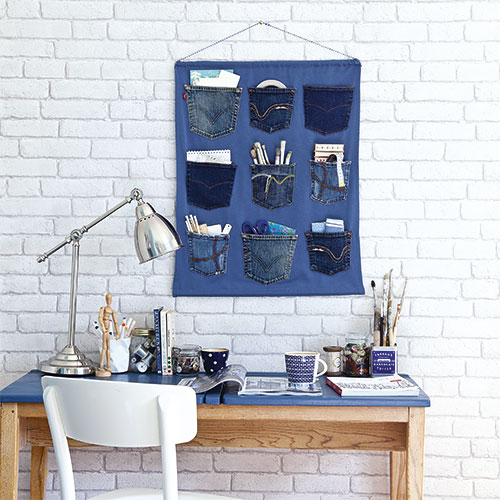
You will need:
5 x pairs of old jeans, from your wardrobe or the charity shop 62cm x 80cm blue fabric 2 x 56cm long wooden dowels from a hardware shop Twine or ribbon Iron & scissors Pins
- 1. Fold over the long sides of the blue fabric backdrop by 1cm then 2.5cm then stitch to create channels into which the dowels will fit.
- 2. Cut around each of the jean back pockets. Place the pockets in three rows of three measuring from the top edge to ensure they are all level. Pin in place. Stitch around the sides and bottom of each pocket to secure to the fabric.
- 3. Thread a length of ribbon through the top channel and tie the ends together to make a hanger. Slide the wooden dowels into the channel to keep the organiser flat.
Painted bottle vases
Don't ditch unwanted glassware -repurpose them with this easy technique.
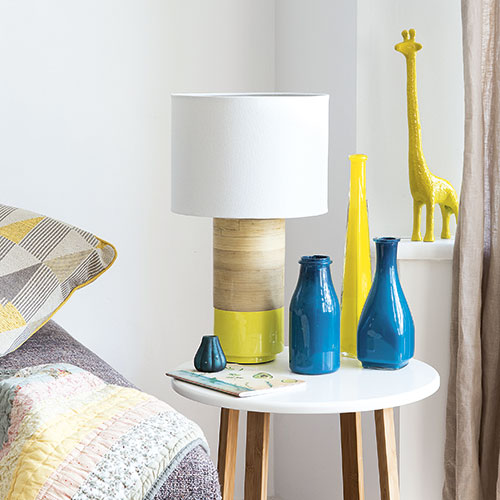
You will need:
Glass vases and bottles Acrylic paint Newspaper or kitchen roll
Get the Ideal Home Newsletter
Sign up to our newsletter for style and decor inspiration, house makeovers, project advice and more.
- 1. Make sure your glasses are completely clean and dry. Working on newspaper squeeze a little paint into the bottom of a vase and shake it lightly to it covers the base and bottom sides.
- 2. Pour more paint into the vase tilting slightly as you go so it covers more of the sides. Hold newspaper over the opening and shake up and down and from side to side to give an even internal coverage.
- 3. Place the vase upside down on newspaper overnight to allow excess paint to drip out. Repeat the process if necessary once dry.
Rope table
Get inspired by rush-weave and make your own smart side table using two FNISS Ikea wastepaper bins.
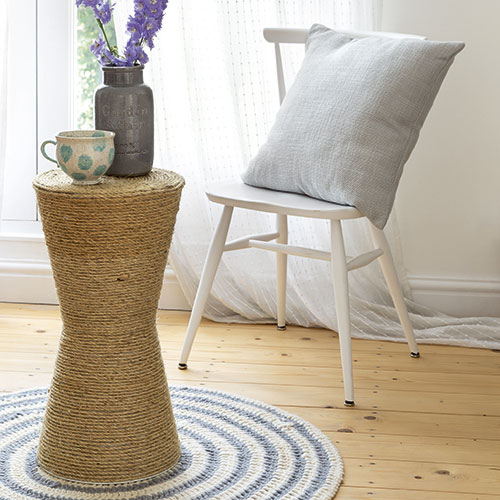
You will need:
2 x FNISS bins, 95p Ikea Glue gun Cutting mat& scalpel
Pencil 38 x 38 piece of thick foam board 2 x sisal rope, Homebase
- 1. Turn one bin over so the opening is face down. On the upturned surface, apply two rings of glue using a hot gun. Stick the base of the second bin onto the glue and hold in place for a few seconds making sure the edges are all aligned neatly.
- 2. Take the sheet of foam board and draw around the base of the joined bins and mark out the circle. Cut out using a scalpel and cutting mat. Using the hot glue gun stick this disc ontop of one bin; this will become the table top. Again, make sure it is well aligned and dry.
- 3. Starting at the base of your table, use the hot glue gun to stick the rope in place, working upwards around the bins. Do this in small sections and pinch the rope together as you go to avoid any white plastic showing through. Once you reach the top, work inwards in a spiral shape to cover the top with rope.
Tin herb planters
Upcycle retro containers into bright and colourful plant pots for your kitchen.
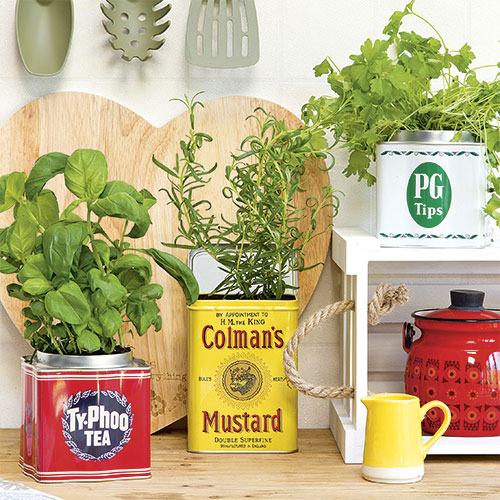
You will need:
Vintage tins of your choice (we used Colman's mustard PG tips and Ty-Phoo tea)
Hammer & nail Fresh herbs Potting compost
- 1. Turn your vintage tin upside down and make small drainage holes in the bottom using a hammer and nail (you can use a drill if you prefer). If you're using a pre-used container, make sure it's clean and dry before starting.
- 2. Place some compost inside the tin and plant your choice of herbs. Add more compost if necessary and keep your tins in a bright, dry area in the kitchen, remembering to water regularly. Research which herbs are best suited to the size of container you have chosen, as some will need more room for growth than others.
Phone book ends
Turn an old and out of date phone into a practical feature piece.
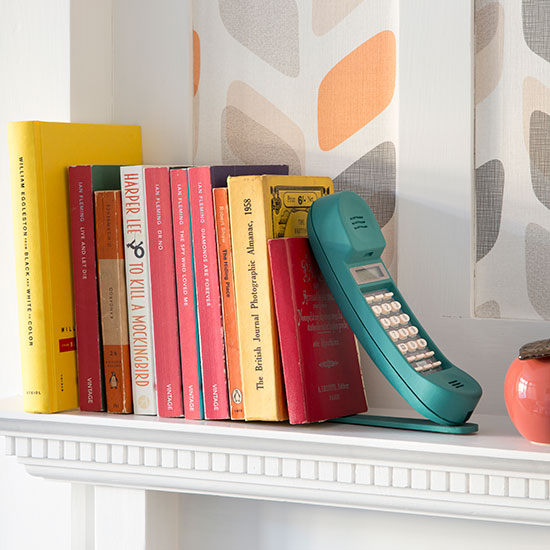
You will need:
Old phone Wooden kitchen spatula Plasti-kote spray paint in a colour of your choice Drill & small drill bit Small screw with washer
- 1. Take the phone handset apart and remove the cord. Take the number buttons out and keep to one side. If you want to keep the markings, cover the keypad with masking tape before spray painting. Cut the end of the wooden spatula off to leave you with the 20cm long handle.
- 2. Working outside, spray the two halves of the handset and the spatula handle with paint and leave to dry. Apply a second coat. Once dry, reassemble the handset. Make a small hole in the base of the phone with a drill and use a screw fed through a washer to fix the spatula to the phone. Tighten to secure. Use this bookend for decorative purposes rather than for supporting lots of heavy books.
Retro patchwork drawers
Create a pretty hallway feature with these delightful drawers.
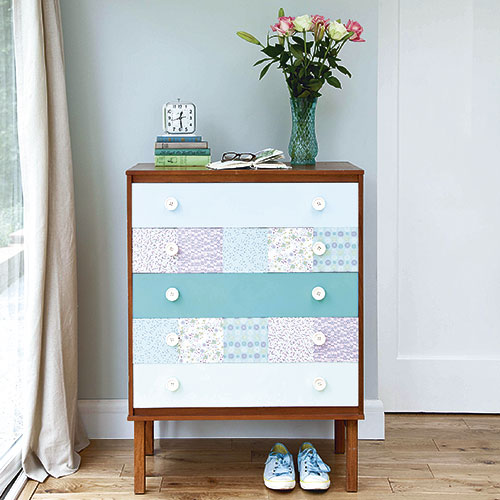
You will need:
Decorators chalk Wooden drawer unit Dust sheet Screwdriver Damp cloth Twist & Spray primer, PlastiKote Three spray paints suitable for furniture in colours of your choice Book of sample paper available from craft shops. We used First Edition 6x6 New Bloom paper, Hobbycraft PVA glue Paintbrush Decorative handles. We used White button handles, £2.95 each, Trinca Ferro
- 1. Use chalk to write one-five on the inside of the drawers before you remove them. On some old pieces, the drawers aren't interchangeable and this way you put them back where you find them. Unscrew all handles.
- 2. Wipe any dust away then spray a layer of primer on the front of drawers One, Three and Five and allow to dry. Spray each with two coats of coloured paint allowing the first to dry as necessary before applying the next.
- 3. Measure the width of one of the remaining drawers. Divide this number by five and trim five different papers to this measurement x the height of the drawer front.
- 4. With the drawer standing on it's back with the front pointing up, brush a generous layer of PVA glue over the wood. Lay each paper square in turn on place neatly butting up all edges. Gently smooth flat with a soft cloth paying particular attention to flatten all edges. Make a hole through the paper at the handle hole then leave to dry. Repeat with the second drawer changing the order of the papers for pretty random effect. Thread new handles through the holes and secure then reassemble the drawer unit.
TIPS: For a budget-friendly version spray the drawers with just one colour. If your unit has all its handles, these can be spray painted too. Push the screw threads through a sheet of cardboard before spraying.
Looking for more revamp ideas? Take a look at our Craft Corner videos that are full of inspirational tutorials to update your home.
Rachel Homer has been in the interiors publishing industry for over 15 years. Starting as a Style Assistant on Inspirations Magazine, she has since worked for some of the UK’s leading interiors magazines and websites. After starting a family, she moved from being a content editor at Idealhome.co.uk to be a digital freelancer and hasn’t looked back.
-
 My go-to Ninja coffee machine is on sale for Easter weekend
It makes coffee shop quality achievable at home
By Molly Cleary
-
 When to plant out annual flowering plants for vibrant, colourful garden borders – and give them the best start, according to experts
Not sure when to plant out annual flowering plants? We've got you covered...
By Kayleigh Dray
-
 I'm a kitchen decor editor and didn't like this tableware trend - until I saw H&M Home's designer-look plates
They made it easy to justify a new crockery set
By Holly Cockburn