How to insulate a shed - step by step for keeping a shed warm and dry
Find out how to keep your shed free from damp, mould, heat and cold
Knowing how to insulate a shed might sound excessive for what is often a glorified storage space, but there are numerous reasons why it’s a good idea.
Energy-efficiency is the buzz word when it comes to insulating your home, but it is also worth protecting your shed too.‘By keeping the shed temperature regulated, it’s easier to keep it looking its best and helps avoid damage from rust and insects as well as damp and mould,’ says Tony Kersey, Homebase Buying Manager.
‘Having an insulated shed means that you’ll create an optimum environment for both you and the shed,’ adds B&Q Category Planner James Benfield. ‘This is necessary if you’re storing weather-sensitive equipment or electronics, such as lawn mowers or strimmers.’
How to insulate a shed - step by step

‘Insulating a timber shed is relatively easy to do yourself,’ says Jenny Davis at Forest Garden. ‘DIY stores have everything you need to tackle the job over a weekend. Whether it’s a tool shed, garden office or potter’s retreat, when your structure is free from drafts and moisture the possibilities of what you can store in and do with that building are endless.’
1. Work out how much insulation you need
Measure the height, length and width of your shed floor and walls and include the space for the studs in this. ‘Don’t forget to measure the height and width of any windows and doors, then multiply the measurements to find the area of each window or door and subtract them from the total square meterage of the wall and floor,’ says Rated People builder, Nathan Hyatt-Mitchell. 'When it comes to the roof, you'll need to measure between the rafters.'
2. Choose which shed insulation to use
There are various types of insulation, depending on where you want to position them - roof, walls, floor. Most are available as rolls or boards, which are fitted between wall studs and roof joists and then covered with plywood. If you’re really trying to save money, there are ways to insulate a shed for free.
‘When selecting the insulation for your shed consider cost, efficiency, insulation properties, use of the shed and ease of installation,’ says Monica Cleere, ToolStation.
Types of shed insulation

Mineral (stone) wool (aka Rockwool)
Available in slabs, stone wool is easy to lay vertically or horizontally. It’s denser than fibreglass (see below), has good thermal and acoustic qualities and is non-combustible. Protective equipment is required when handling.
‘Because of its sound-proofing properties, stone wool is great if you’re looking at turning a shed into a workspace,’ says Rose Milner. ‘Stone wool boards usually friction fit between studs so don’t require fixings, making them easy to install. However, you’ll also need breather membranes and vapour control layers to prevent any damp ingress, which can eat into the usable space.’
PIR or foam slabs/boards
Great for heat retention and sound-proofing, these lightweight boards are easy to cut and install. They can be used for suspended wooden floors, pitched roofs and internal walls, and secured with adhesive or ‘friction fit’. These would suit those who use noisy power tools, due to their thermal and acoustic properties.
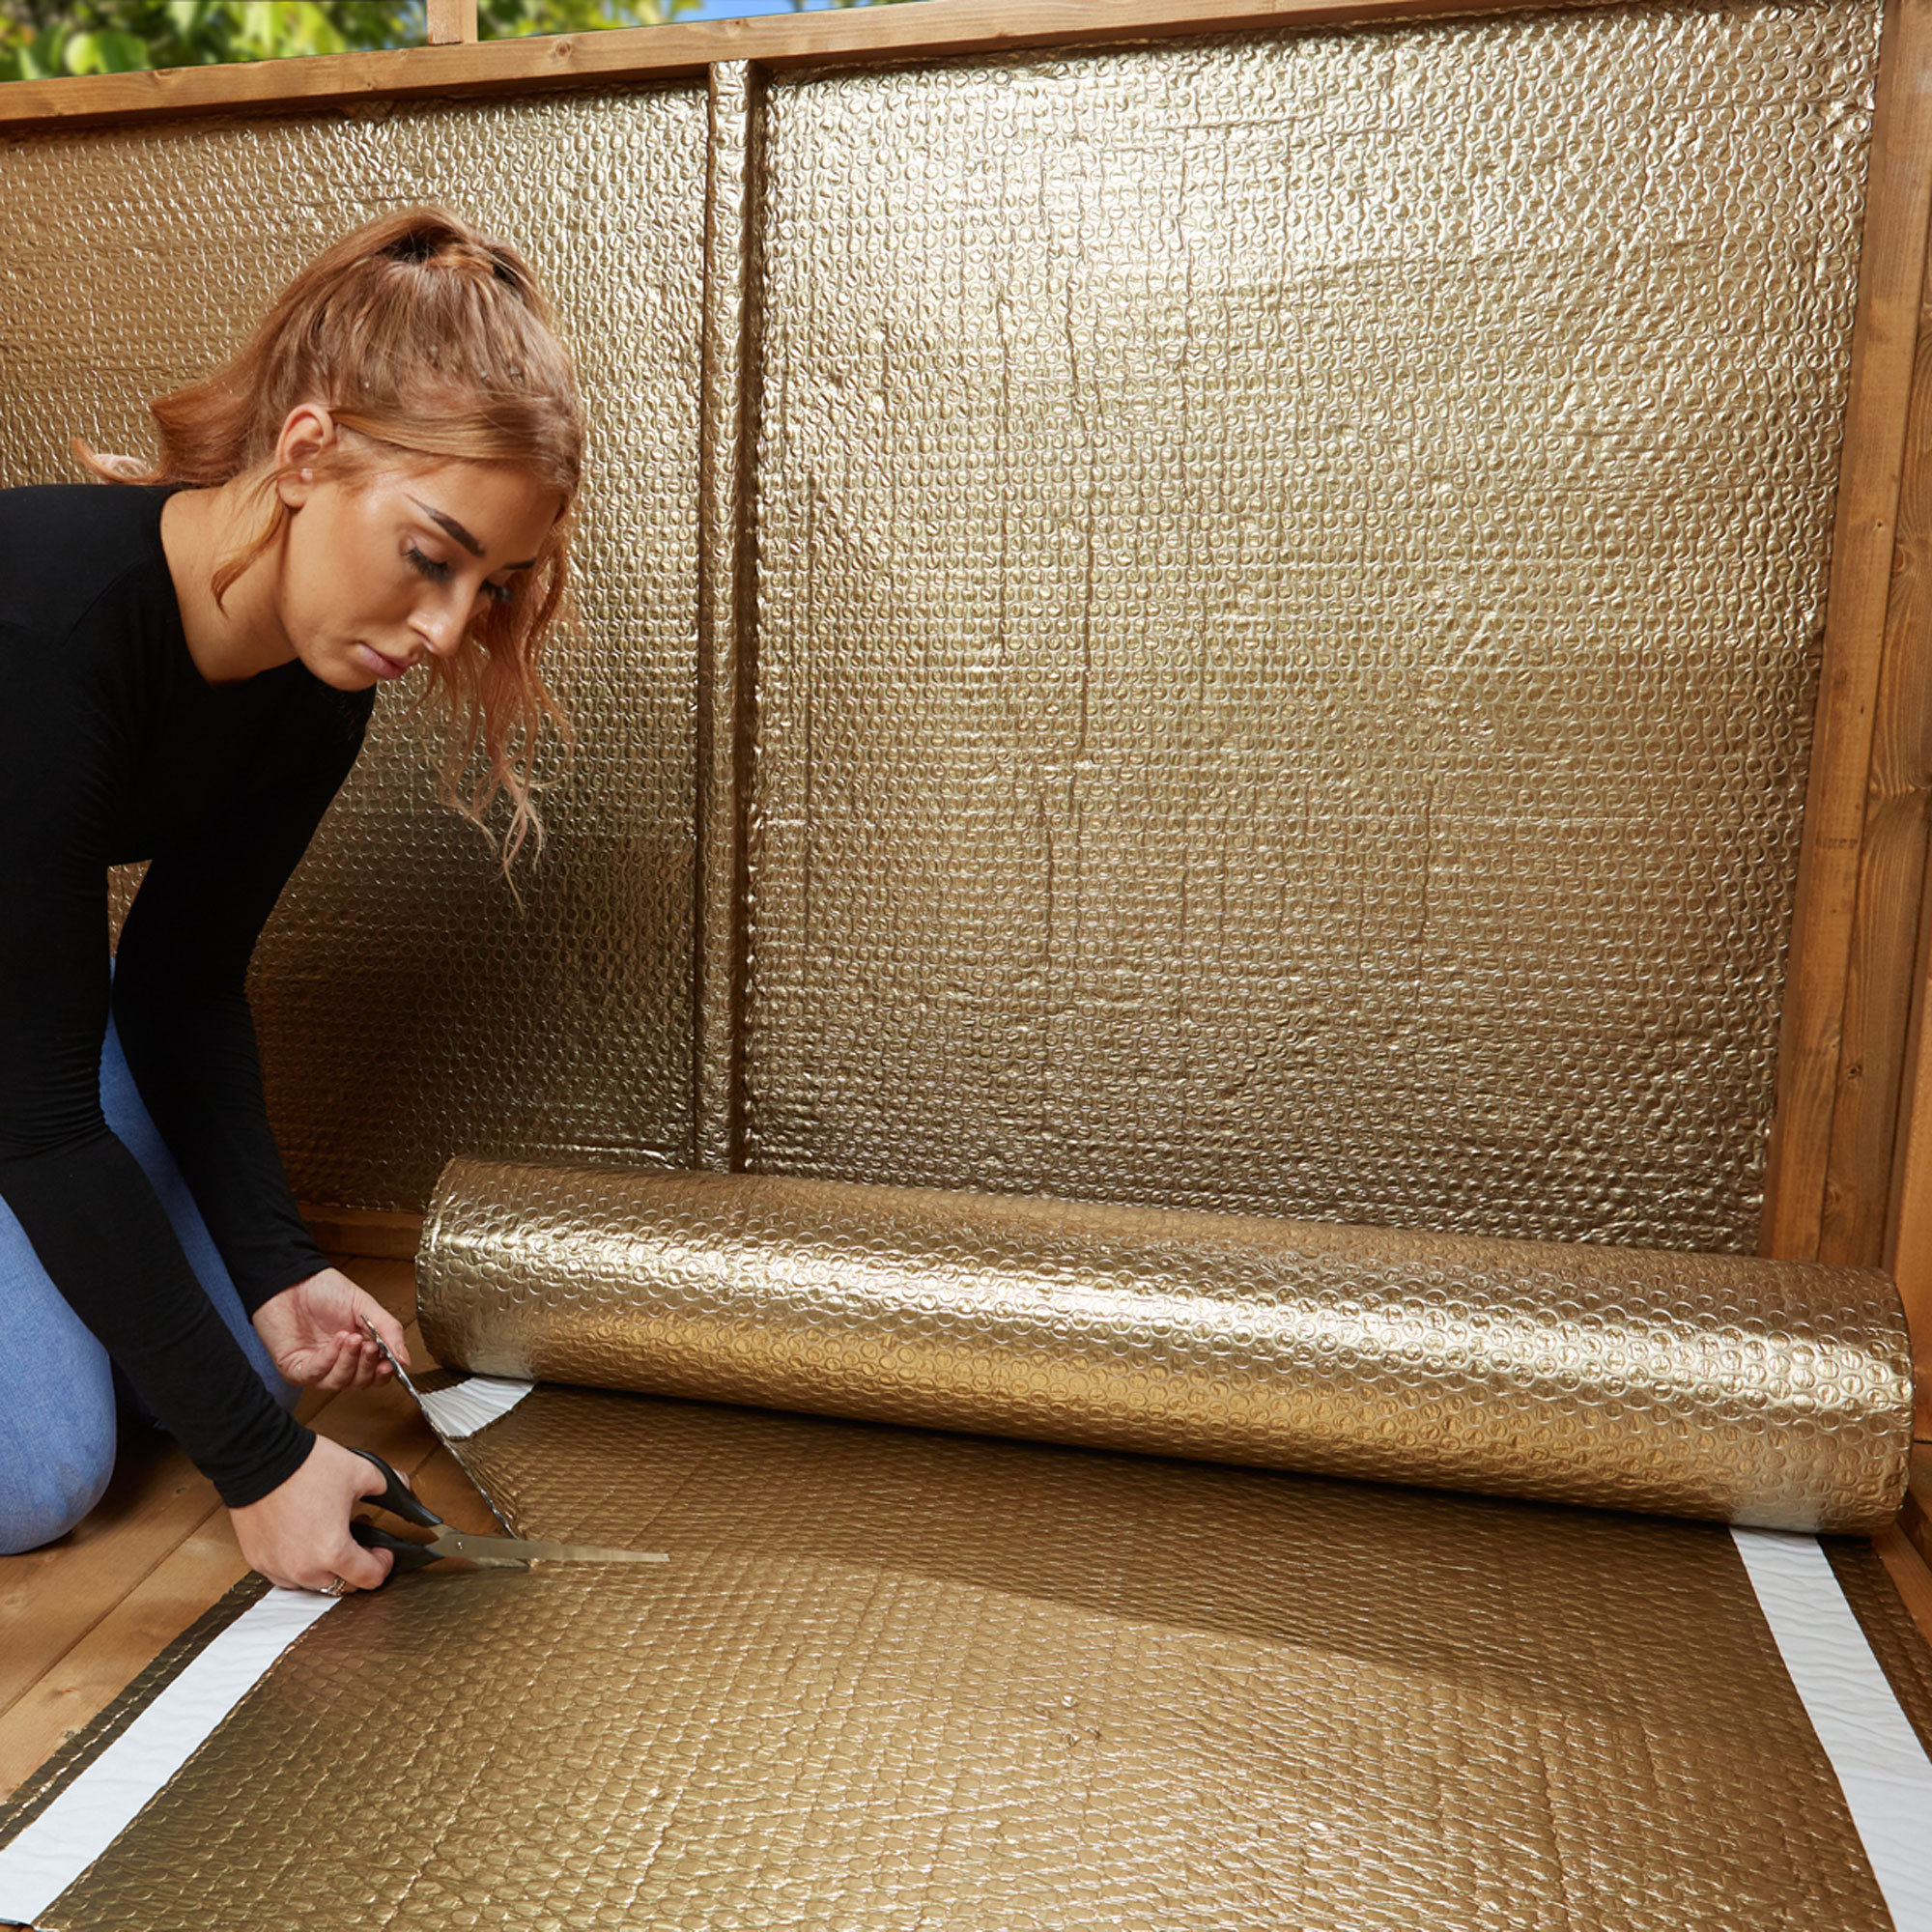
Multi-foil
‘Multi-foil is an excellent option for sheds, and is often more cost-effective than PIR as well as being simpler to install,’ says Rosie Milner. ‘Although, if you were converting your shed to inspiring garden room ideas, it would require air gaps to be the most effective and wouldn’t work so well in a fully-sealed environment.’
Sheeps wool (thermafleece)
Made with 75% British wool and 25% recycled polyester, thermafleece can be installed without gloves or protective clothing. It’s breathable, durable and easy to install. Cosywool slabs friction fit and don’t slump, so they’re great for shed walls.
Hemp
If you prefer plant fibres, Natrahemp fleece can be handled without gloves, fits securely between studs, joints (or rafters), and provides excellent thermal and acoustic insulation.
‘We would recommend natural insulation, like sheep’s wool, as it’s less prone to slumping,’ says Rose Milner. ‘PIR board or multi-foil insulation are also good. All of these options are simple to fit and don't require moisture protection – and unlike fibreglass, only minimal PPE is recommended, making them ideal options for DIYers.’
Fibreglass wool
Generally used for roof and loft insulation, fibreglass wool is available in rolls, relatively inexpensive and simple to install. However, it’s vital to wear protective goggles, mask and gloves when handling glass wool, as it’s itchy to work with and the tiny fibres can irritate skin, eyes and lungs.
‘Fibreglass loft insulation is not ideal for sheds,’ says Insulation Superstore's Rosie Milner. ‘It’s more suitable rolled out in the loft, as it’s susceptible to ‘slumping’ if installed vertically.’
3. Clear the shed and prepare the space
Empty your shed completely and make any necessary repairs. ‘Check for any leaks, damp and gaps and seal with a wood-based sealant,’ says Rated People builder, Nathan Hyatt-Mitchell.
‘A shed will lose heat through the roof too, so secure any loose roofing material externally and seal around the doors and windows with silicone or spray foam too.’
4. Make sure you have the right equipment

Once you’ve chosen the insulation, check the manufacturer’s recommended list of tools required and specific installation instructions. Depending on the insulation you’re using generally you’ll need a dust sheet, staple gun, stanley knife, measuring tape, hammer, nails, adhesive and a hand saw, plus protective goggles, gloves and overalls if required.
If you’re including the inside of a pitched roof you’ll likely need a step ladder and a friend to hold it too.
5. How to insulate a shed
Cut strips of insulation by length and width to fit between each stud in the walls, pitched roof or floor. Deal with any obstacles that might get in the way of the insulation being laid and (if required) add a vapour barrier.
‘Press the insulation gently between the two studs and be aware the moisture barrier must face towards the room,’ says Rated People’s builder, Nathan Hyatt-Mitchell. ‘There are various options to secure the insulation; use a staple gun for walls and use steel wire for floors.’ Of course if you’ve chosen ‘friction fit’ this can just be wedged between the studs.
The UK’s first Home Energy Week launches to provide you with the best advice and ideas to help you save energy at home. Home Energy Week will culminate in the London Homebuilding & Renovating Show – held at the ExCeL, Friday 30 Sept to Sunday 2 Oct – where a daily seminar programme will deliver everything you need to know about insulating your home to choosing the right heating system. There will also be experts on hand to offer you one-to-one advice regarding your property.
Get your two free tickets to the event today.
Get the Ideal Home Newsletter
Sign up to our newsletter for style and decor inspiration, house makeovers, project advice and more.
Jacky Parker is a freelance interiors & lifestyle journalist, specialising in modern interiors, design and eco living. She has written for Future’s interior magazines and websites including Livingetc, Homes & Gardens, Country Homes & Interiors and Ideal Home for over fifteen years, both as a freelance contributor and inhouse, with stints as Acting Digital Editor, Livingetc and Acting Style Content Editor, Country Homes & Interiors. Her work also features in national and international publications including Sunday Times Style, Telegraph Stella, The Guardian, Grand Designs, House Beautiful and more. With years of experience in the industry Jacky is privy to the insider view and the go-to places for interior inspiration and design-savvy décor.
-
 Will a conservatory add value to your home and how can you maximise it?
This is what the pros say
By Amy Reeves
-
 I’ve been looking for a new signature scent for my home and The White Company's new fragrance is the exact summer holiday smell I needed
Santorini smells fresh, summery and sophisticated
By Kezia Reynolds
-
 How to remove algae from garden walls in five steps – and the cleaning product experts rave about for tackling it fast
Experts share their top tips for getting garden walls algae-free
By Katie Sims
